This post contains affiliate links, which means I may receive a small commission, at no cost to you, if you make a purchase through a link
Pinterest is a great source of traffic to blogs; it is an online search engine. However, when you have a blog there is just so much to get your head around, it becomes a bit overwhelming.
From SEO to social media and keywords, bloggers can sometimes feel like they can’t do it all. To be fair, I’ve never managed that, however, I do use apps and programs to help me out where possible. A few years ago, when I started to blog more, I started looking into Tailwind to see if it could help with my Pinterest. My stats on Pinterest were terrible, in fact, I was getting less than 5 clicks through a month and my monthly reach was just over 5k.
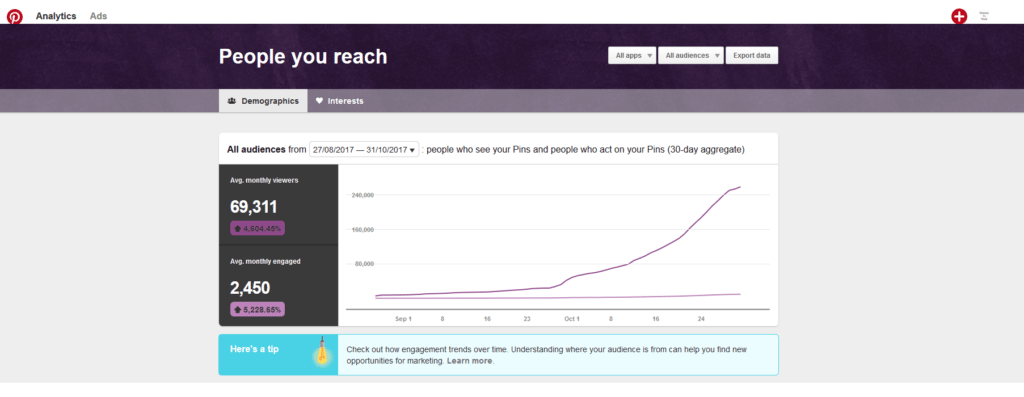
In my first 3 months of using Tailwind, my monthly reach jumped to over 255k and my engagement went up. I was amazing to watch this increase but also take some of the pressure of pinning etc off me. Here is a picture of the growth in those 3 months.
What I didn’t realise was just how much more Tailwind could do for my blog!
My monthly reach is now over 6 million… that is right I’ve gone from 5k to 6 million. I’m not going to lie and tell you this has been a quick fix. It was not overnight and there has been sometimes where it has gone down as I have been working on what I thought was the best approach.
I am going to share my method of attack when it comes to using Tailwind to boost my Pinterest reach and engagement, everyone is different, and you may wish to tweak this to your site. Firstly, though you will need to invest in Tailwind. I use the Tailwind Plus but pay annually, this gives me unlimited pin scheduling (I will come to why I find this useful in a bit). I also have Tribes Pro, again to me this is important, and we will come back to this in a moment.
Once you have both, you are ready to build your Pinterest profile! I am going to walk you through step by step what I do on my Tailwind.
Getting started on Tailwind
Once you are set up on Tailwind, it is worth starting on your board lists. This is just going to make it easy for you to pin to multiple boards in one go. Personally, I have several board lists set up for the most frequently shared posts from my blog, which you can see below.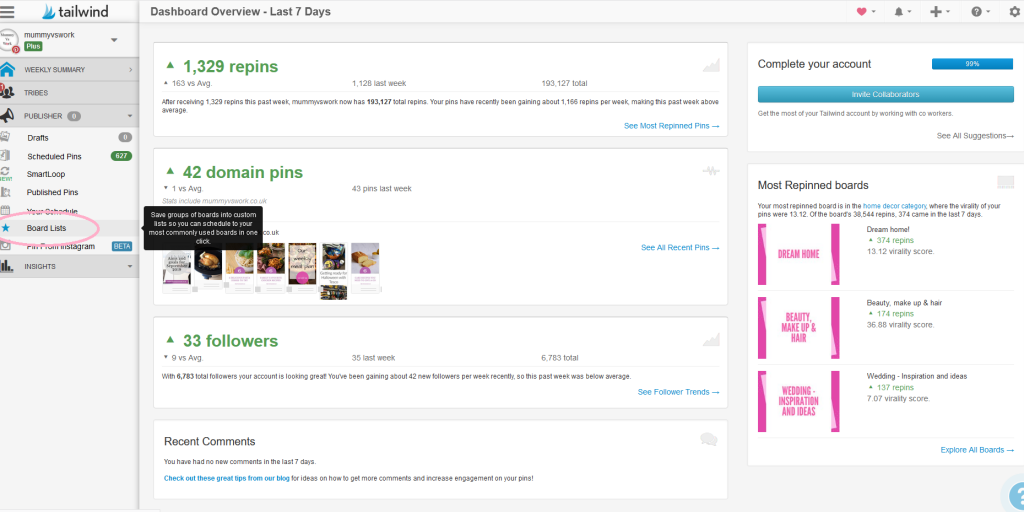
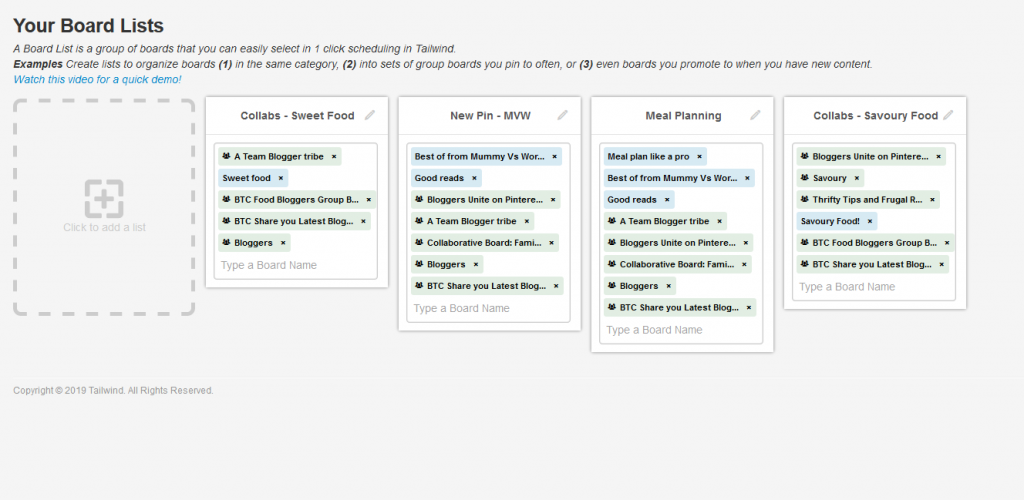 The way board list work is super simple. Instead of me, for example, pinning to every board individually with my meal plan. I can select my meal plan board list and it will save to all of those boards in one go. So, with one click of a button, I can add that pin to 8 boards in a matter of seconds.
If you cover a variety of topics you can create as many board lists as you like.
How many pins should you be scheduling?
Once you have your board lists sorted, it is time to sort out your Pinterest schedule. Everyone will give you different advice on how many you should pin. Not only that though, how many you should pin from your site and how many should be scheduled and manually pinned.
I have never found a right or wrong with this if I am honest, in fact, the times I have followed the advice I have seen my reach plummet sometimes. Over the last 2 years, it has turned out the best approach has been trial and error to find out what works for me.
Currently, my schedule is set to 35 pins a day. This has worked the best for me recently, though I have tried 50 pins a day all the way down to 25 pins a day. Give it some time and try out the schedule to suit you.
Setting your schedule is quite easy to do and Tailwind is clever enough to read your Pinterest data and optimise your pins to the best times. This could result in some days having the desired number of pins and other days there being fewer pins than planned.
To set your schedule, head to the Your Schedule menu shown below. Then select recreate schedule next to the smart schedule. This will give you a pop-up box with the option of how many pins you would like to plan into your schedule.
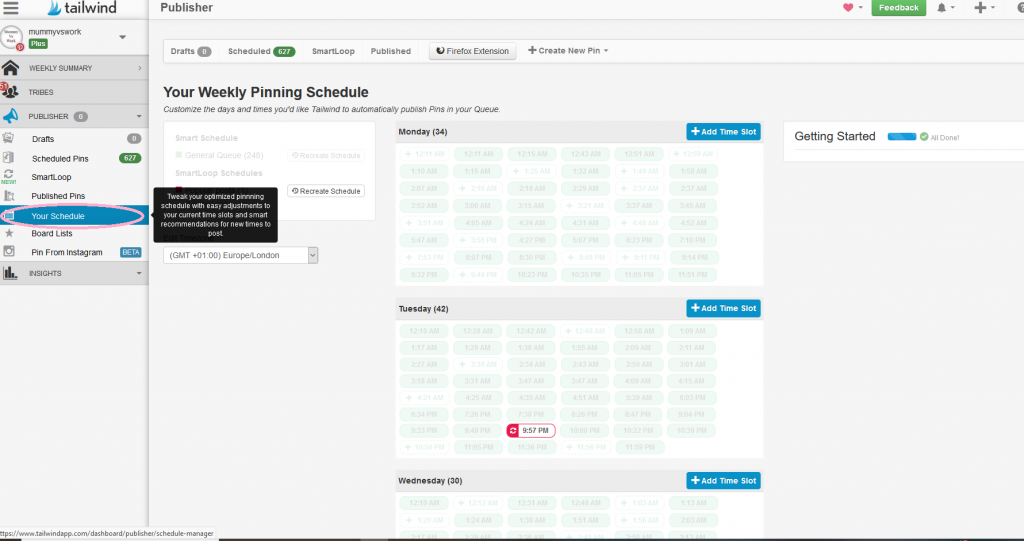

This is trial and error depending on your traffic and followers, try a set amount for a few weeks and if you plateau out, adjust it slightly and see what happens.
Getting started with tribes
We have our schedule and board list, now there is just 1 bit missing from the Tailwind starting puzzle, tribes.
I touched on this earlier about how important tribes are. To me, they are blogging buddies who are going to give you a little Pinterest boost. Don’t however be fooled into thinking every tribe is going to make your pins go viral. That simply isn’t how tribes work.
Most tribes have a 1:1 re-pin ratio. So, for every pin, you share you should re-pin one pin back. Now that part is straight forward, but just imagine a tribe with 100 members, those 100 members could all pin the same image meaning you pin someone else’s but get no re-pins of your own image.
This was a bit of an extreme example however I don’t want you to fall into the trap of believing tribes is the answer to your Pinterest boost.
My best tip for tribes, be active. Bloggers reciprocate bloggers more if they are active and take part in the tribe. After all, the more you help the more willing people are to help you out.
You will be limited to the number of tribes you can join though, so choose your tribes carefully. I have a general topic tribe with over 70 members if you would like to join, you can find that here.
I am going to do a whole separate post on Tailwind Tribes and how to use them in the next few weeks, so look out for that one.
Now to get scheduling
As I mentioned earlier, I pay for my Tailwind annual, this is because I can schedule as many pins as I like with no restrictions.
This then helps the approach I use for getting my pins scheduled as I always attack my pinning by bulk pinning.
For example, I am normally pinned at least a month in advance. On average I try and pin between 300-500 pins a session, then I know I am covered for a few weeks before I need to start pinning again.
With limited time I try and utilise the time I have scheduled by pinning in bulk by category, so recently I have been filling in lots of Halloween themed pins ready for that coming up. I would then pick another board and try and pin 20-30 pins on that. Just repeating for a few boards until I have enough pins for those sessions pinning.
Then when I publish a new post and add it to the schedule, I shuffle my pins using this button.
You can move pins around in your schedule by just clicking and dragging them, likewise, you can lock them in place too. So should you plan in advance and end up with a Halloween post appearing on your schedule in November, simply move it up to a relevant date. This will just shuffle along with everything else after it by 1 slot.
When you are pinning from your own site there are always a few things to remember.
- Pin to all your relevant boards – for me I have a Best of Mummy Vs Work board that I always pin from my blog on. If it is a meal plan post, it goes on that board, likewise, reviews go on the review board
- Pin to your tribes – It is always worth sharing to your tribes, make sure though you are following the tribe rules when doing so.
- Pin to collaborative boards – These are boards that other bloggers pin to as well.
Trial and error
I am no Pinterest expert, this is just what has worked for me over the last 2 years. There have been lots of adjustments I have made during that time and this is just where I have got to now. I am sure in the coming weeks, months and years I will still be tweaking my approach with Pinterest as they make changes. I will try and share a bit more in-depth on Tribes, pinnable images and other features of Tailwind in the coming weeks to help you get the most from your Tailwind.
